
1. Classic French Manicure – Reinvented for 2026
The French manicure has been a symbol of effortless elegance for decades. But in 2026, it’s getting a bold makeover. Instead of the traditional white tip, fashion influencers are embracing colored tips (baby blue, lavender, mint green) and double‑line tips (two thin parallel lines near the edge). Another trending variation is the “micro French” – an ultra‑thin line that sits just 1mm from the tip, giving a more natural and elongated look to the nail bed.
For a modern French manicure at home: start with a sheer nude or pink base (two thin coats). Then use a fine liner brush to paint the tips. The key is symmetry – use guide stickers if needed. Finish with a high‑shine gel top coat for a glass‑like finish. This style works on all nail shapes, but oval and almond shapes look particularly sophisticated. Brides love it because it matches any wedding theme, and office workers appreciate its professional yet playful vibe.
Pro tip: If you want to stand out, try a reverse French – paint the color along the cuticle line instead of the tip. Use metallic gold or silver for a luxe evening look.

2. Ombre Nails – Gradient Magic for Every Season
Ombre nails (also called dip‑dye or gradient nails) create a seamless blend from one color to another. The most requested combinations right now are: pastel pink to white (spring), coral to peach (summer), lavender to deep purple (fall), and icy blue to silver (winter). You can even do a vertical ombre (light at the cuticle, dark at the tip) or a horizontal ombre (color changes from left to right across the nail).
To achieve salon‑quality ombre at home, you’ll need a makeup sponge. Paint two stripes of polish on the sponge (e.g., pink and white), then dab it onto the nail in gentle rolling motions. Repeat 2‑3 times for opacity. Clean up the skin around the nail with a brush dipped in acetone. The final step is essential: a thick, glossy top coat will hide any sponge texture and make the gradient appear smooth as silk.
Ombre nails are universally flattering – they make short nails look longer and add dimension to long nails. For a dramatic evening look, try a black‑to‑red ombre or a navy‑to‑holographic glitter ombre. Avoid dark‑to‑light ombre if your nails are stained; use a white base coat first.

3. Matte Nails – Velvet Finish That Turns Heads
Matte nails have moved from a niche trend to a mainstream staple. A matte top coat transforms any glossy polish into a soft, suede‑like surface. Dark shades truly shine in matte: black, burgundy, charcoal, and navy look expensive and mysterious. Pastels also work well – a matte lavender or baby blue feels modern and calming.
One important rule: matte polish shows every imperfection. Your nail surface must be perfectly smooth and clean before application. Buff away ridges, and avoid thick coats. Apply two thin layers of your color, then one thin layer of matte top coat. Do not use a glossy top coat underneath – it will prevent the matte finish from adhering.
The most exciting matte trend is “matte with glossy accents”. Paint your entire nail matte, then use a glossy top coat to draw geometric lines, dots, or a single French tip. The contrast between velvet and shine is stunning. For a moody fall look, try a matte burgundy base with glossy gold leaf fragments. Remember: matte nails show wear faster than glossy ones – carry a small bottle of matte top coat for touch‑ups.
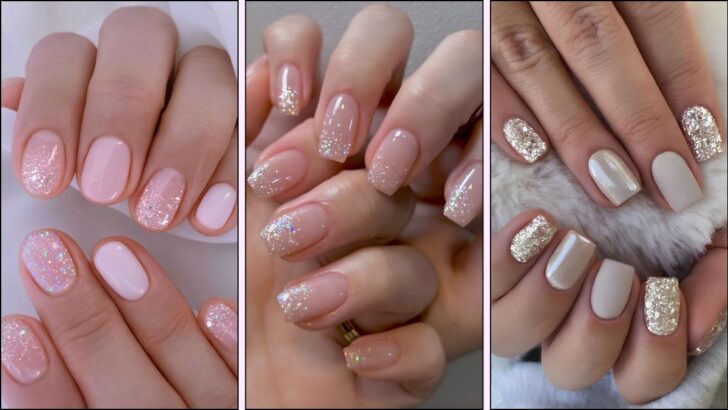
4. Glitter & Sparkle – Party Ready All Year Round
Glitter nails are not just for New Year’s Eve anymore. They have become a go‑to for birthdays, concerts, date nights, and even summer festivals. You can choose from fine shimmer (a subtle sparkle), chunky hexagonal glitter (bold and playful), or holographic glitter (rainbow reflections). The application method matters: for full coverage, paint a glitter polish directly; for a scattered effect, tap loose glitter over a tacky base.
The biggest mistake people make is applying glitter unevenly. To avoid bald spots, use a sponge to dab glitter onto the nail – this presses the particles flat and increases density. Another pro trick: apply a clear gel top coat over glitter, then wipe off the sticky inhibition layer – the glitter will look like it’s suspended in glass.
Trending glitter styles for 2026: “glitter french” (only the tips are glittery), “accent nail” (one glitter nail per hand), and “gradient glitter” (dense at the tip, fading to nothing at the cuticle). Silver, gold, and rose gold are classics, but don’t be afraid of multicolored “confetti” glitter. Removal is tricky – use the foil wrap method with acetone to avoid damaging your natural nails.
5. Minimalist Nail Art – Less is More, Always in Style
Minimalist nail art is the answer for anyone who finds full‑coverage designs too loud. The philosophy is simple: use clean lines, tiny geometric shapes, or negative space to create a “barely there” decoration. Popular designs include a single vertical line down the center of the nail, two tiny dots near the cuticle, a small heart on the ring finger, or a half‑moon at the base (negative space style).
To execute minimalist art, you need a fine liner brush (size 00 or 000) and high‑quality black or white polish. Start with a clear or nude base coat – let it dry completely. Then, with a steady hand, draw your design. Do not overload the brush; wipe excess polish on the edge of the bottle. If you make a mistake, use a small brush dipped in acetone to clean up before the polish dries.
Minimalist nails grow out beautifully because there is no harsh line to mark the growth. This makes them perfect for low‑maintenance people or frequent travelers. They also photograph well for social media – try a matte nude base with a glossy black line for a striking contrast. For a more playful look, use pastel colors instead of black.
6. Neon Nails – High Voltage Color for Bold Personalities
Neon nails are not for the shy. Shades like electric lime, hot pink, laser lemon, and tangerine scream for attention. They work best on short, squared nails (the shape keeps the focus on the color). However, you can also wear neon on long stiletto nails for a cyberpunk aesthetic. The key to neon success is the white base coat – neon pigments are translucent, so without a solid white underneath, they look dull and patchy.
Apply one coat of white polish, let it dry completely, then apply two thin coats of your neon color. Do not use thick coats – neon polish takes longer to dry and can wrinkle. A quick‑dry top coat is essential to seal the color and prevent fading. Neon shades are prone to fading in sunlight, so if you plan to be outdoors a lot, choose a gel neon polish or apply a UV‑blocking top coat.
Trending neon styles: “neon French tips” (white base with neon tips), “color block” (different neon colors on each nail), and “neon ombre” (blending two neons like pink to orange). For a 90s throwback, try neon green with black squiggly lines. Warning: neon nails will stain your natural nails if you skip the base coat. Always use a strengthening base coat first.

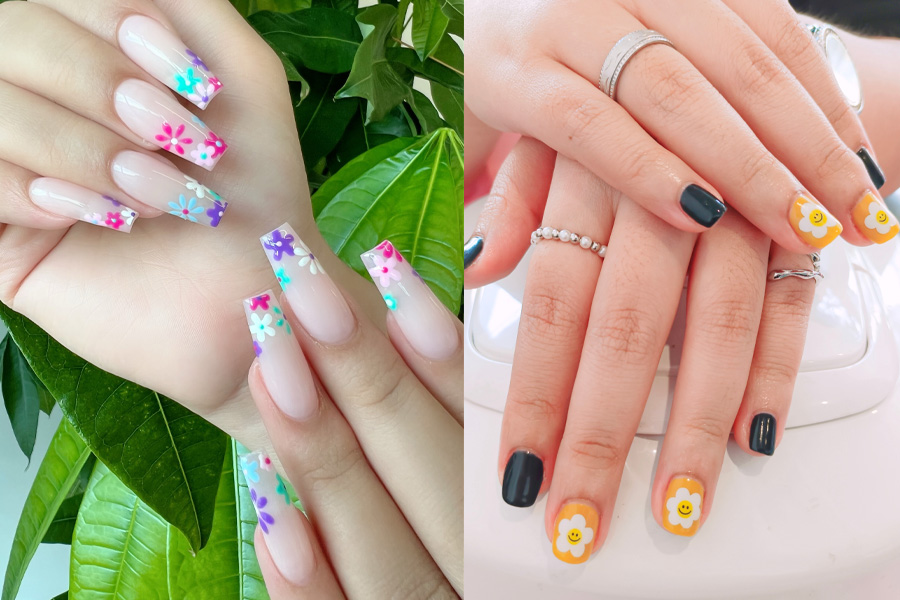
7. Floral Nail Designs – Spring Vibes All Year
Floral nail art brings a touch of nature to your fingertips. From delicate daisies to intricate roses, flowers can be painted, stamped, or applied as stickers. The most popular flowers for nails are cherry blossoms (pink with tiny centers), sunflowers (yellow petals with brown dots), and lavender (small purple dots on green stems). For beginners, daisies are easiest: use a dotting tool to create five white petals around a yellow center.
If you struggle with freehand painting, invest in a floral nail stamping plate. Apply polish to the plate, scrape off excess, pick up the design with a stamper, and press onto your nail. It takes practice but gives perfect, repeatable flowers. Another option: water‑slide decals – soak them in water, slide onto the nail, seal with top coat.
Floral nails are ideal for weddings, garden parties, and spring holidays. Combine them with a pastel background (mint, lavender, baby pink) for a soft romantic look. For winter, try dark red roses on a black or navy matte background. To make flowers last longer, encapsulate them under a layer of clear gel or acrylic. Avoid large 3D flowers if you work with your hands – they catch on things.
8. Marble Nails – Stone Elegance for Every Occasion
Marble nails mimic the natural swirls of marble stone – and they look incredibly sophisticated. The classic marble uses white, grey, and black, but modern versions use pastel colors (pink and white marble) or jewel tones (emerald and gold). Each nail becomes a unique piece of art because no two marbles are identical. The effect works on all nail lengths but looks especially striking on medium almond or coffin shapes.
How to create marble nails at home: apply a white base coat and let it dry. Then drop small dots of grey and black polish onto the nail. While the polish is still wet, use a thin brush or a toothpick to swirl the colors together in a figure‑eight pattern. Do not over‑swirl – you want defined veins, not a muddy mess. Clean the brush after each swirl. Finish with a high‑shine gel top coat to mimic polished marble.
For an extra luxury touch, add gold or silver foil fragments before the top coat. Crumple the foil, press it lightly onto the wet swirls, then seal. Marble nails are perfect for brides, evening events, or anyone who wants “expensive” nails without rhinestones. They also hide minor chips well because the pattern is irregular.

9. Stiletto Nails – Sharp, Bold, and Fierce
Stiletto nails are the ultimate statement shape. They are long, pointed like a stiletto heel, and impossible to ignore. This shape elongates the fingers and gives a dramatic, edgy silhouette. Stiletto nails are almost always created with acrylic or hard gel because natural nails rarely grow long enough without breaking. The shape requires regular maintenance – every 2‑3 weeks – because the sharp tip can dull or chip.
When choosing a design for stiletto nails, keep it relatively simple. The shape itself is the star. Solid colors (black, nude, deep red, metallic silver) work best. Avoid busy patterns that compete with the silhouette. However, a single glitter accent nail or a subtle ombre can look amazing. Many celebrities wear stiletto nails with negative space designs – leaving parts of the nail bare for a modern, high‑fashion look.
Important warnings: stiletto nails are not practical for everyone. You cannot type easily, button jeans, or pick up small objects. They can also be dangerous – you might accidentally scratch yourself or others. If you work in healthcare, childcare, or food service, this shape is not allowed. But for photoshoots, parties, or personal style expression, stiletto nails are unmatched in attitude.
10. Gel vs Acrylic Nails – Which One Should You Choose?
One of the most common questions in nail fashion is: gel or acrylic? Both are artificial nail enhancements, but they differ in application, durability, removal, and look. Gel nails are made from a liquid resin that cures under a UV or LED lamp. They are odorless, flexible, and look very natural – like a thicker, glossier version of your own nail. Gel can be applied as an overlay on natural nails or as extensions using forms. Removal requires filing down the top layer and soaking in acetone for 10‑15 minutes.
Acrylic nails are created by mixing a liquid monomer with a powder polymer. This mixture forms a hard, durable layer that air‑dries in minutes. Acrylic is stronger than gel, making it ideal for very long nails or people who are hard on their hands (e.g., manual work, nail biting). However, acrylic has a strong chemical smell during application and requires more filing to shape. Removal involves soaking in acetone for 20‑30 minutes, or professional filing.
Which one to choose? Choose gel if you want a natural, glossy look, no smell, and easier removal. Choose acrylic if you need extreme durability, very long lengths, or have oily nail beds that reject gel. Both can be decorated with polish, gel color, or nail art. Many salons offer “gel‑over‑acrylic” – the strength of acrylic with the shine of gel. Always go to a trained technician for removal to avoid damaging your natural nails.